How to Measure & Draw a Room (the right way!)
FREEBIE INCLUDED!
Measuring and drawing a room accurately and consistently every time is a critical part of the design process. Even if you have architectural drawings, you’ll need to be able to do this from time to time.
Even if you outsource your drawings to a consultant, you’ll need to gather the proper information.
These days, there are all kinds of apps that will scan a room and produce drawings. Having tested them all, I believe wholeheartedly you should not rely on apps to measure your space (at least yet). The best way is with a good old-fashioned tape measure and laser.
Finally, this process is always best done with 2 people. So grab an assistant even if you don’t have one regularly working with you. Hire a design student for a day to lend a hand.
Let’s get started.
Let’s start with the Tools:
25’ Heavy Duty Tape Measure - Preferably with the ⅛” increments
Laser Measure - Good for overall measurements & ceiling heights
Ruler or Scale
Plum Bob (Optional)
Here’s a riddle. So what’s the first tool you will need to pick up? Nope, not the tape measure. It’s your pencil and paper.
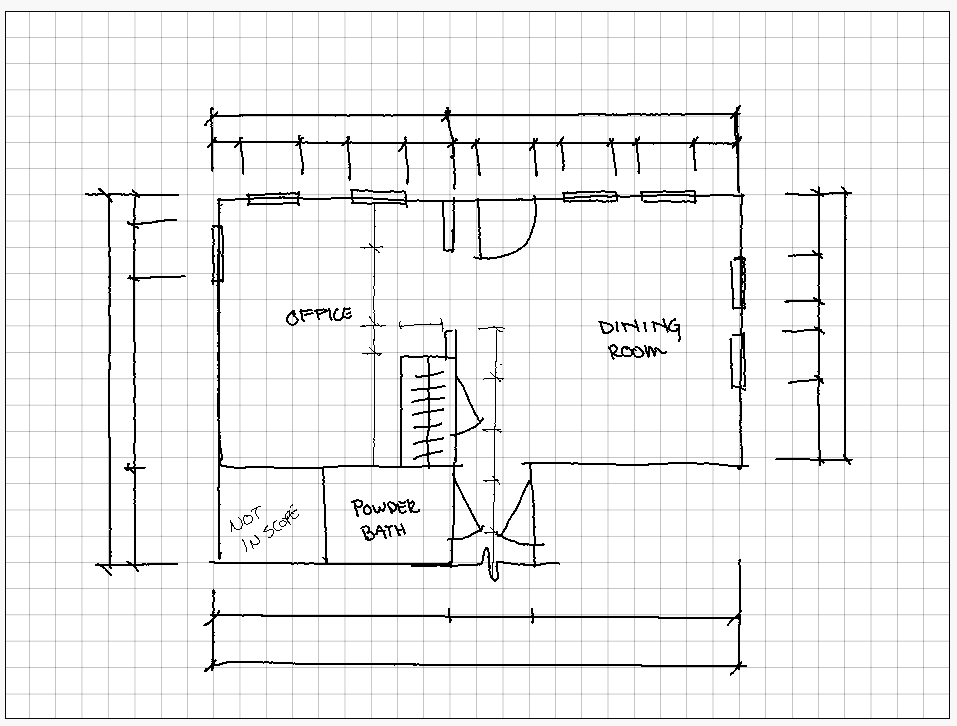
Step 1: Draw the space
It should look something like this. It doesn’t need to be perfectly to scale. You can do that in your drawing software. Show the locations of all windows and doors, showing the direction of the swing. Leave enough space around the outside of the drawing to have 2 rows of dimensions lines.

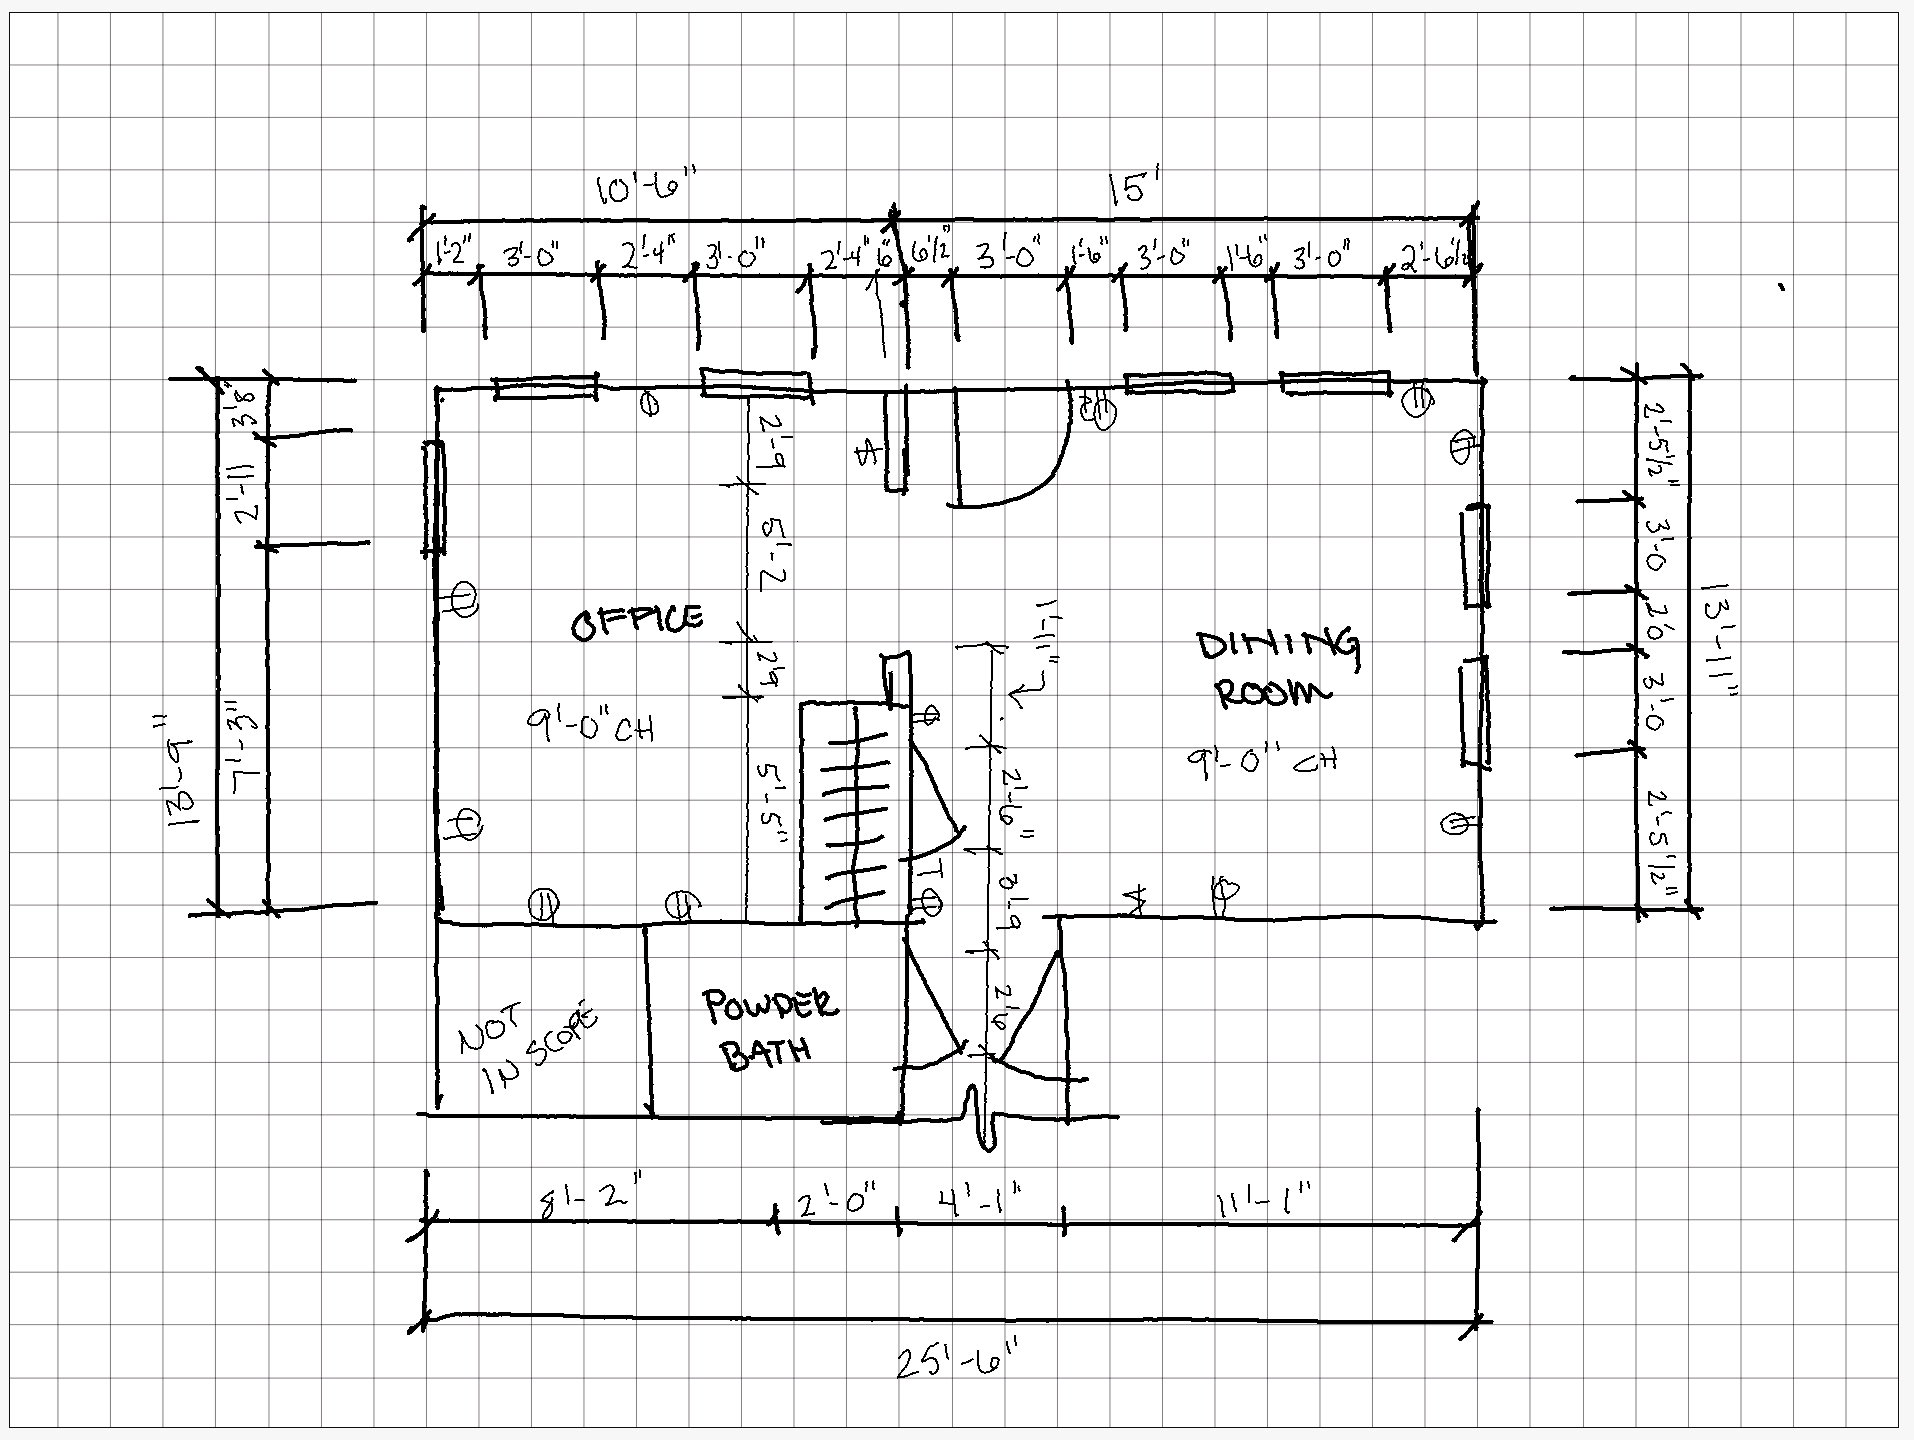
STEP 2: DRAW DIMENSION LINES
You will need space to draw 2 rows of lines - One for your incremental dimensions, and the second row for your overall measurements. These should go on the far outside of the drawing as a single row. Sometimes you will need to note internal dimensions as well.
It’s going to get a little crowded so using a mechanical pencil is best to erase mistakes and keep the lines skinny.
STEP 3: BEGIN TAKING YOUR MEASUREMENTS
This is when an assistant is super helpful. One person can measure while the second one annotates the drawing.
ALWAYS:
Call out in feet and inches (or metric if not in US)
Example 12’ - 8 ½ “ is “Twelve Feet, Eight and one half inches”
Round to nearest ¼ inch. Don’t bother with fifth or eight inch increments. We aren’t designing Swiss watches here.
The person writing down the measurements should ALWAYS repeat back to the person measuring to avoid mistakes.
Measure to openings - NOT to the trim. Be consistent. You might make a note of the trim width.
Begin with the laser measure and get your overall measurements.
Then start with your tape measure in one corner of the room going clockwise until you have every incremental measurement.
Start from the corner to the first opening. Inside width of opening (door or window). Then the inside corner of the opening to the next opening and so on until every opening and distance between is accounted for.
When you are done, get the ceiling height using the laser measure. If you have a sloped ceiling, get the lowest and tallest dimensions.
Example of your measurement path

Example of sketch with dimensions

STEP 4: NOTE THE LOCATIONS OF OUTLETS, VENTS, SWITCHES, AND ANY OTHER OBSTRUCTIONS
I can’t emphasize enough how important this step is. Knowing where vents, outlets, and other obstructions or elements are will save you endless headaches.
Here’s what to capture:
Switches
Outlets
Thermostats
Vents/Returns or other HVAC elements
Any other obstructions
STEP 5: MEASURE THE LOCATION OF LIGHT FIXTURES
This is optional depending on your project needs. Knowing where your existing junction boxes (JBox’s) are located can help you understand if they are symmetrical or not. In turn, you will develop a floorplan that makes the most sense. Sometimes lights will need to be moved so you’ll want to account for that. Other times, you can work with existing locations.
Person #1 will hang the plumbob from the center of the fixture while Person #2 will measure the distance from two walls. You must get the distance from an X & Y axis to get the accurate location.
GET A PRINTABLE VERSION OF THIS STEP-BY-STEP PROCESS BELOW!

Grab your Printable Guide!
How to Measure & Draw a Room (the right way!)
Hey designer. Thanks for reading. When you try something using the links we provide, we may earn a small commission at no cost to you. We only provide suggestions for products we actually use and recommend. Your support helps keep the blog going. Thank you!